Saturday, July 30, 2011

So many Ideas!

I didn't get the sewing machine working, and my Momma-in-law-to-be can make it over until Monday so I spent yesterday and today looking for wedding DIY projects and theme Ideas.

So far I've found 4 things that I want to incorperate.


I adore these mini Polariod Magnets. I thing they'd be super cute as part of the save the dates I'll be putting together in the next few weeks.


These tissue paper carnations almost look like the real thing! The pink is definitely out... but white "carnations" tinged with teal (to match the wedding colors of teal, silver and white) would make perfect centre piece flowers.


This Brooch Boquet is darling and very "vintage". I'd use this idea but mix in a few flowers to make it a little more my style.


I like the base of this number holder for another idea I had for part of the centre piece. I don't want to give it away... but I will post about it when I get to that project.


I think I'm going to have to sit down and focus on putting together a project timeline soon. I've got about 5 months to pull this all together and I am still not sure about what the "theme" is yet. I like the look of raw wood (branches, birch, etc.) but not sure how that ties into a winter wedding. The Official date is January 1st... Do you have any ideas/suggestions? Any help is appreciated :)

Friday, July 29, 2011


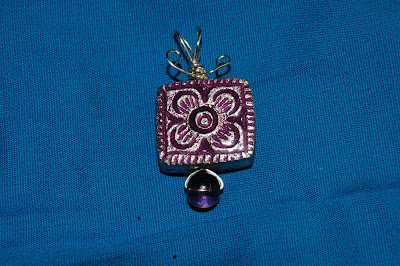
The above necklace came as part of a starter kit. Being new to texas I have alot of time on my hands (when I'm not cleaning, organizing, taking photos, doing laundry and planning the wedding) so I decided to try my hand at some jewelry.


It was alot easier than I thought and I ended up ignoring most of the "directions" and just making my own stuff.


It didn't take long before I was back at the craft supply store, scoping out deals and checking out different types of jewelry making ideas. Now I am not claiming to be amazing at it. The wire wrapped rings below are the first that I've made and there is some definite technique to wire wrapped jewelry, But I am having fun :)


This ring is definitely my favorite :) I haven't taken it off since I made it this morning!


I think I am going to add jewelry to the list of things I want to perfect. Once I get my etsy store up and running (maybe this weekend?) I'll be adding these items and more. Tomorrow I am going to try and figure out the sewing machine I got earlier this week... maybe I'll actually make something worthy of posting? We shall have to see LOL

I just have to say... I"m LOVING my life right now :D

Wednesday, July 27, 2011

I've got the best Mom-in-Law-to-be!!!

OK... I have to tell the world... My Mother-in-law-to-be is Ah-Mazing! Yesterday she dropped by with these...


2 MASSIVE bins of yarn :) I found it quite amusing that yarn very similar to what I have purchased in the past was $.92 compared to the $5.00+ I've paid. CRAZY!! I've got a bunch of projects in mind for all this goodness... that will keep me busy for a while.

Then today she popped by to drop this off...


Mule mentioned to her the other day that I needed a sewing machine, so when she came across this at one of the local thrift stores she grabbed it for me :) I'm in crafting heaven!! I get to go fabric shopping now :D

Stay tuned tomorrow...I'm going to tell you all about some jewellery I've been making. I love discovering new (to me anyways) craft mediums!

Tuesday, July 26, 2011

Photo Challenge

I've just joined a 20 week photography challenge and I am super excited! Once a week I'll be posting a photo based on the challenge and then linking it to astepinthejourney.blogspot.com

Guess that means I need to get out my camera and get to work... like that is so hard for me to do LOL

I'll also be posting more of my past work this week on my photography blog jsalterphotography.blogspot.com


Sunday, July 24, 2011

First Project :)

For my first official project I decided to create some wall art for a babies room. I'm adding it to a super sweet site whoopdwhoop.com. Its a handmade swapping market place, no money exchanges hands. You earn "whoops" by loading items to swap into your account, and when someone requests the item you earn whatever "whoops" its worth. Its alot simpler than it sounds LOL. I added some cards I whipped up (check them out here )

I started by picking a font, making it as large as possible, and then cutting them out.


Then I traced it onto cardboard (from a soda can box... it was a little thin so I doubled up.)


Then I pulled out the trusty glue gun and chose my yarn. I went with blue this time. To make things a little simpler I wound smaller amounts of yarn that would pass through the spaces in the letters easier. I also cut a bunch of pieces about an inch long to cover the ends.


Take the smaller bundles of wool and start wrapping :) Depending on the letters you use, some will be easier than others. The most challenging of the 3 I did today was the "B". As you run short of yarn glue it in place on the back with at least half an inch at the end to tuck under. Glue the end of the new bundle and then cover it as you wrap. When you have covered the whole letter, use a needle to tuck in the end.


I'm totally in love with the finished product! I'm thinking of doing some words like this for the Bedroom make over... I think they'd look cool in black as word art over the head board. :)


If you'd like these letters for yourself, check out whoopdwhoop.com and request them:) I'm making them available in any color!

First Official Post...

Alright... I've taken the leap! I'm joinging the world of craft/DIY bloggers :) I have a mile long list of projects I want to try and a bunch of crafts I do on a regular basis. Next step opening an Etsy shop... I'll be sure to post here when I do.

My goal is to post at least 3-4 times a week... We'll see how that goes :)